HackerNewsScraper.java
HtmlPage page = client.getPage(baseUrl);
List<HtmlElement> itemList =  page.getByXPath("//tr[@class='athing']");
if(itemList.isEmpty())")[1];
else")[1];
Printing the result in your IDE is cool, but exporting to JSON or another well formated/reusable format is better. We will use JSON, with the Jackson library, to map items in JSON format.
First we need a POJO (plain old java object) to represent the Hacker News items :
HackerNewsItem.java
public class HackerNewsItem {
private String title;

private String url ;
private String author;
private int score;
private int position ;
private int id ;

public HackerNewsItem(String title, String url, String author, int score, int position, int id)
    jobId = stringResponse.split("\
//getters and setters
}
Then add the Jackson dependency to your pom.xml : pom.xml
Now all we have to do is create an HackerNewsItem, set its attributes, and convert it to JSON string (or a file …). Replace the old System.out.prinln() by this :
HackerNewsScraper.java
HackerNewsItem hnItem = new HackerNewsItem(title, url, author, score, position, id);
ObjectMapper mapper = new ObjectMapper();
String jsonString = mapper.writeValueAsString(hnItem) ;
// print or save to a file
System.out.println(jsonString);
And that’s it. You should have a nice list of JSON formatted items.
Go further
You can find the full code in this Github repository.
3. Handling forms
In this chapter, we are going to see how to handle forms on the web. Knowing how to submit forms can be critical to extract information behind a login form, or to perform actions that require to be authenticated. Here are some examples of actions that require to submit a form :
- Create an account
- Authentication
- Post a comment on a blog
- Upload an image or a file
- Search and Filtering on a website
- Collecting a user email
- Collecting payment information from a user
- Any user-generated content !
Form Theory
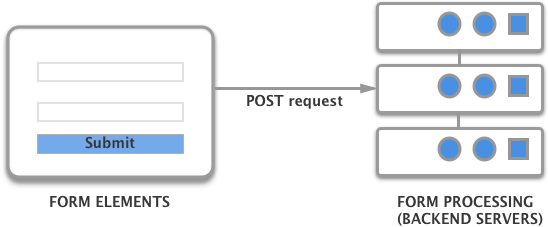
There are two parts of a functional HTML form: the user interface (defined by its HTML code and CSS) with different inputs and the backend code, which is going to process the different values the user entered, for example by storing it in a database, or charging the credit card in case of a payment form.
Form tag
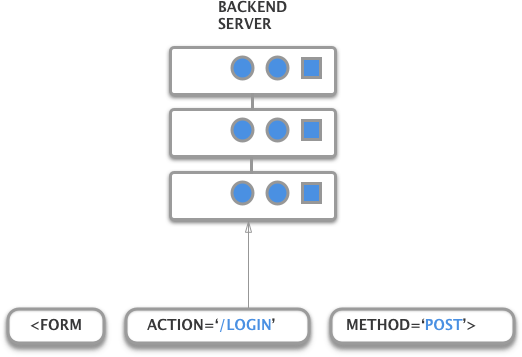
HTML forms begins with a tag. There are many attributes. The most important ones are the action and method attribute.
The action attribute represents the URL where the HTTP request will be sent, and the method attribute specifies which HTTP method to use.
Generally, POST methods are used when you create or modify something, for example:
- Login forms
- Account creation
- Add a comment to a blog
Form inputs
In order to collect user inputs, the element is used. It is this element that makes the text field appear. The element has different attributes :
- type: email, text, radio, file, date…
- name: the name associated with the value that will be sent
- many more
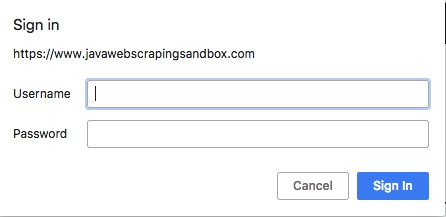
Let’s take an example of a typical login form :
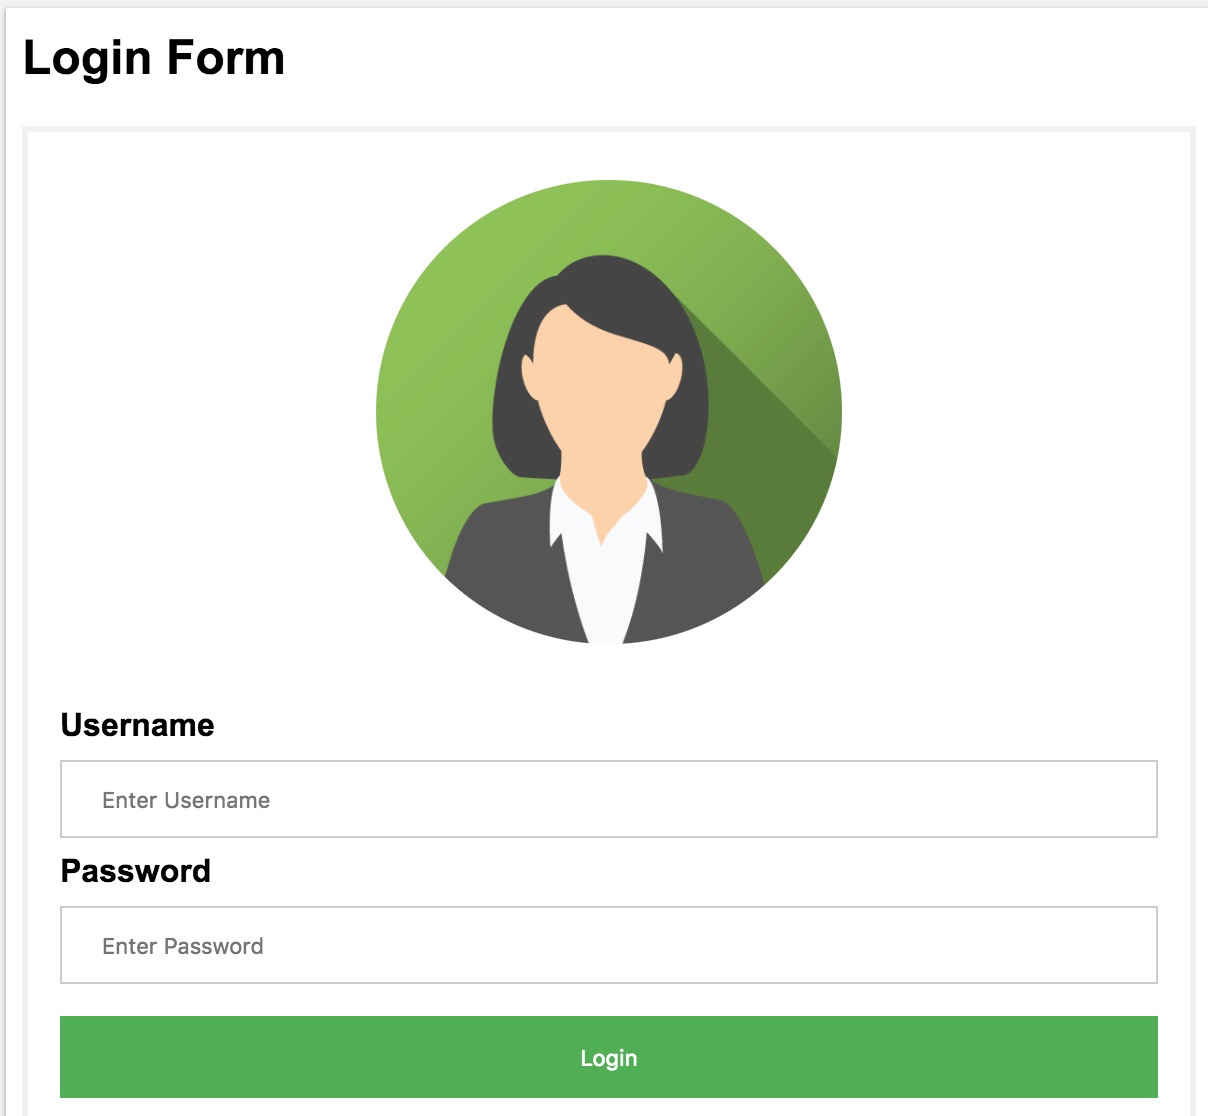
And here is the corresponding HTML code (CSS code is not included):
<form action="login" method="POST">
  <div class="imgcontainer">
    <img src="img_avatar2.png" alt="Avatar" class="avatar">
  div>

  <div class="container">
    <label for="uname"><b>Usernameb>label>
    <input type="text" placeholder="Enter Username" name="uname" required>

    <label for="psw"><b>Passwordb>label>
    <input type="password" placeholder="Enter Password" name="psw" required>

    <button type="submit">Loginbutton>

  div>

form>
When a user fills the form with his credentials, let’s say usernameand my_great_password and click the submit button, the request sent by the browser will look like this :
POST /login HTTP/1.1
Host: example.com
Content-Type: application/x-www-form-urlencoded
uname=username&psw=my_great_password
Cookies
After the POST request is made, if the credentials are valid the server will generally set cookies in the response headers, to allow the user to navigate.
This cookie is often named (the name depends on the technology/framework used by the website’s backend):
- session_id
- session
- JSESSION_ID
- PHPSESSID
This cookie will be sent for each subsequent requests by the browser, and the website’s backend will check its presence and validity to authorize requests. Cookies are not only used for login, but for lots of different use cases:
- Shopping carts
- User preferences
- Tracking user behavior
Cookies are small key/value pairs stored in the browser, or in an HTTP client, that looks like this:
cookie_name=cookie_value
An HTTP response that sets a cookie looks like this:
HTTP/1.0 200 OK
Content-type: text/html
Set-Cookie: cookie_name=cookie_value
An HTTP request with a cookie looks like this:
GET /sample_page.html HTTP/1.1
Host: www.example.org
Cookie: cookie_name=cookie_value
A cookie can have different attributes :
- Expires: Expiration date, by default, cookies expire when the client closes the connection.
- Secure: only sent to HTTPS URLs
- HttpOnly: Inaccessible to Javascript
Document.cookie, to prevent session hijacking and XSS attack - Domain: Specifies which host is allowed to receive the cookie
Login forms
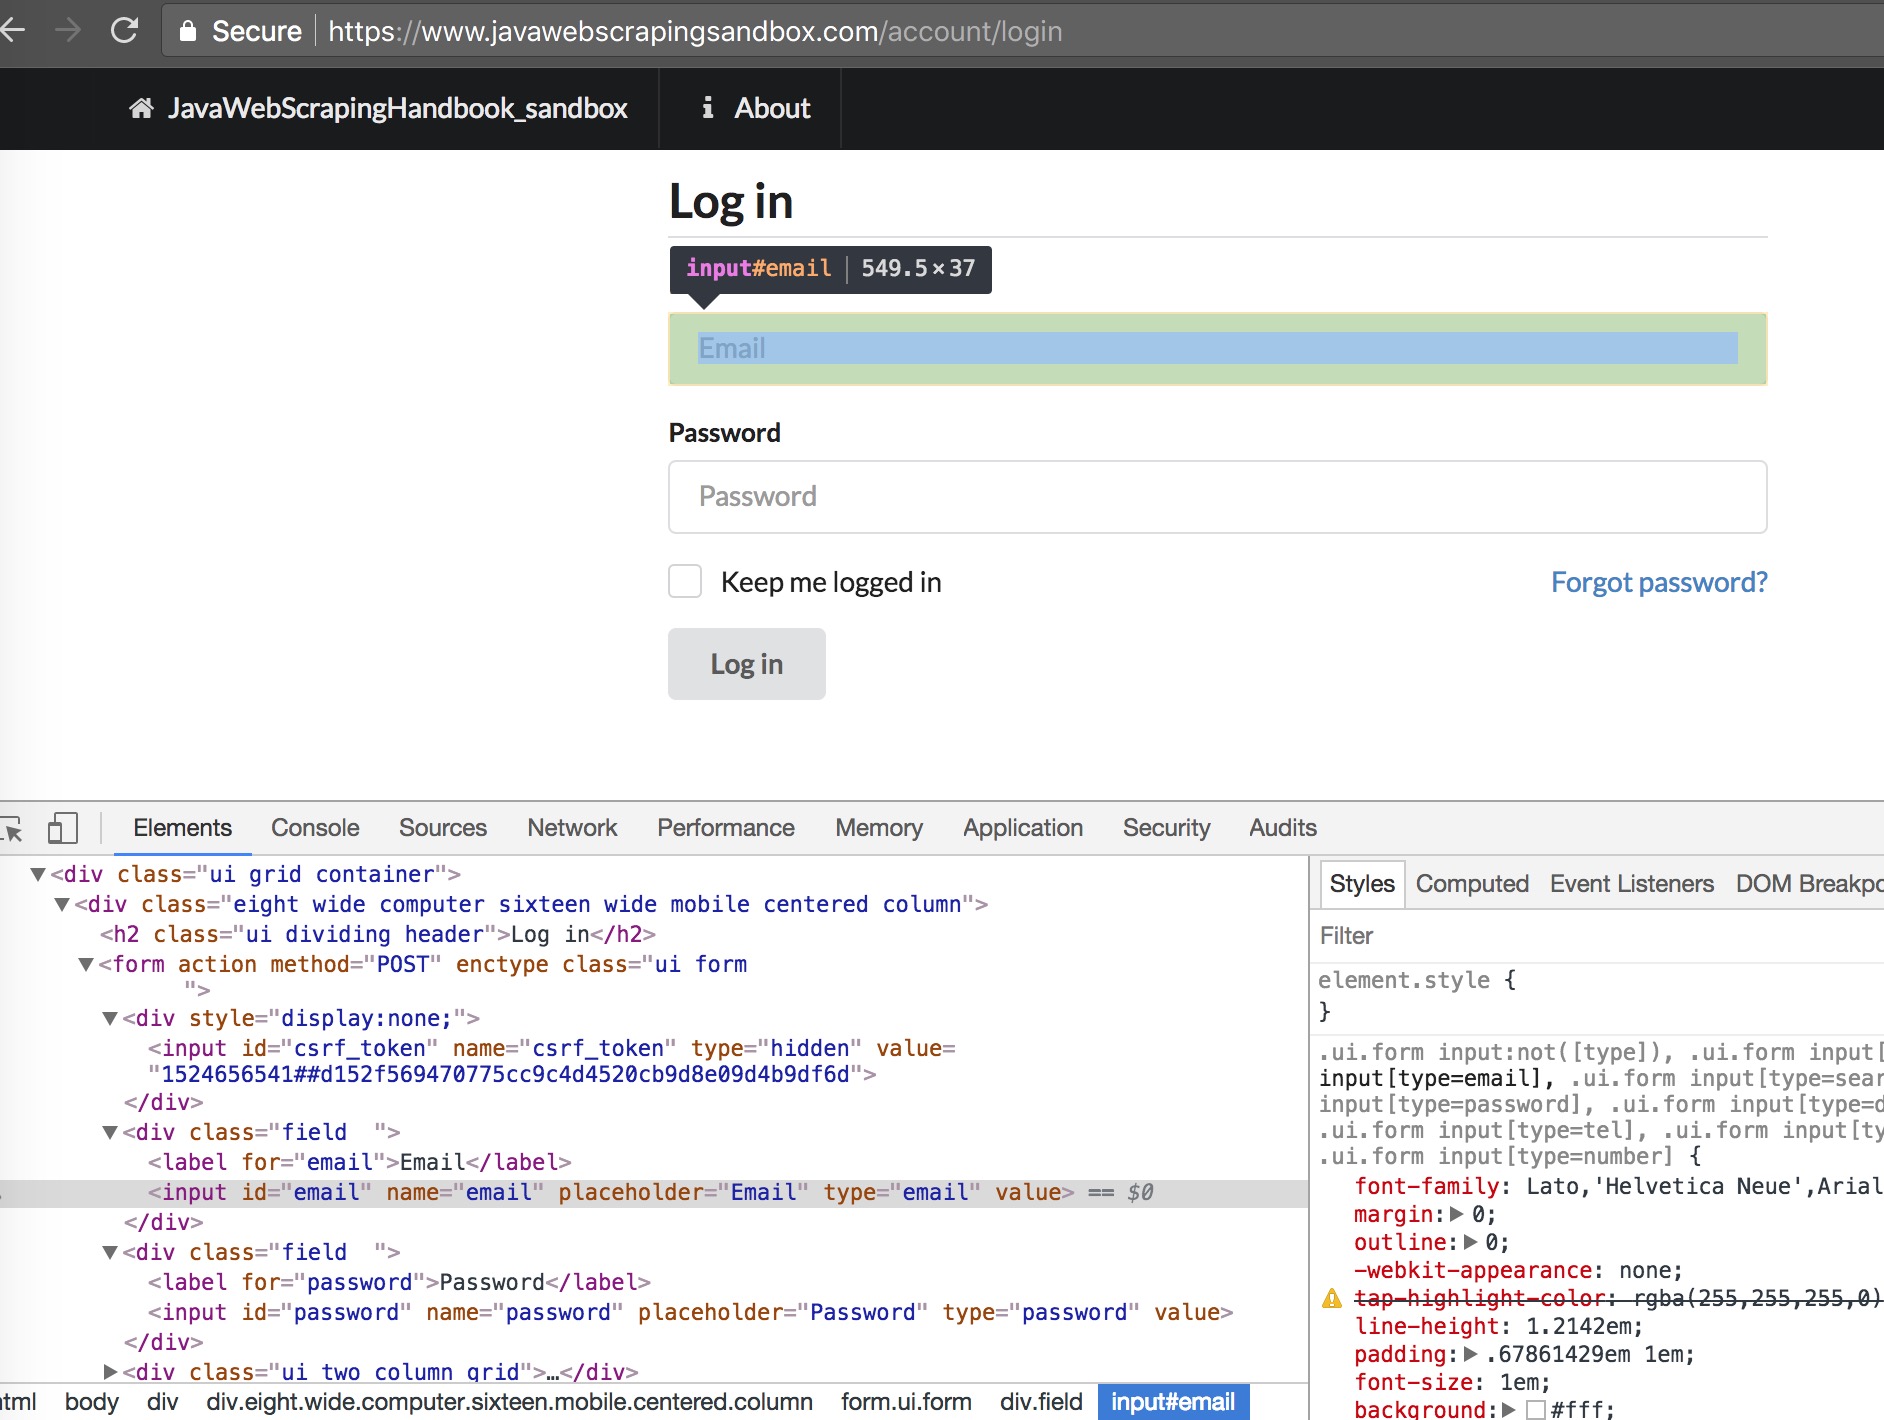
To study login forms, let me introduce you the website I made to apply some example in this book : https://www.javawebscrapingsandbox.com
This website will serve for the rest of the book for lots of different examples, starting with the authentication example. Let’s take a look at the login form HTML :
Basically, our scraper needs to :
- Get to the login page
- Fills the input with the right credentials
- Submit the form
- Check if there is an error message or if we are logged in.
There are two “difficult” thing here, the XPath expressions to select the different inputs, and how to submit the form.
To select the email input, it is quite simple, we have to select the first input inside a form, which name attribute is equal to email, so this XPath attribute should be ok: //form//input[@name="email"].
Same for the password input : //form//input[@name="password"]
To submit the form, HtmlUnit provides a great method to select a form : HtmlForm loginForm = input.getEnclosingForm().
Once you have the form object, you can generate the POST request for this form using: loginForm.getWebRequest(null) that’s all you have to do 🙂
Let’s take a look at the full code:
public class Authentication {

static final String baseUrl = "https://www.javawebscrapingsandbox.com/" ;
static final String loginUrl = "account/login" ;
static final String email = "test@test.com" ;
static final String password = "test" ;

public static void main(String[] args) throws FailingHttpStatusCodeException,
 MalformedURLException, IOException, InterruptedException {
WebClient client = new WebClient();
client.getOptions().setJavaScriptEnabled(true);
client.getOptions().setCssEnabled(false);
client.getOptions().setUseInsecureSSL(true);
java.util.logging.Logger.getLogger("com.gargoylesoftware").setLevel(Level.OFF);

// Get the login page
HtmlPage page = client.getPage(String.
format("%s%s", baseUrl, loginUrl)) ;

// Select the email input
HtmlInput inputEmail = page.getFirstByXPath(
"//form//input[@name='email']");

// Select the password input
HtmlInput inputPassword = page.getFirstByXPath(
"//form//input[@name='password']");

// Set the value for both inputs
inputEmail.setValueAttribute(email);
inputPassword.setValueAttribute(password);

// Select the form
HtmlForm loginForm = inputPassword.getEnclosingForm() ;

// Generate the POST request with the form
page = client.getPage(loginForm.getWebRequest(null));

if(!page.asText().contains("You are now logged in")){
System.err.println("Error: Authentication failed");
}else{
System.out.println("Success ! Logged in");
}

}
}
This method works for almost every websites. Sometimes if the website uses a Javascript framework, HtmlUnit will not be able to execute the Javascript code (even with setJavaScriptEnabled(true) ) and you will have to either 1) inspect the HTTP POST request in Chrome Dev Tools and recreate it, or use Headless Chrome which I will cover in the next chapter.
Let’s take a look at the POST request created by HtmlUnit when we call loginForm.getWebRequest(null). To view this, launch the main method in debug mode, and inspect the content (ctrl/cmd + MAJ + D in eclipse) :
WebRequest[]
We have a lot going one here. You can see that instead of just having two parameters sent to the server (email and password), we also have a csrf_token parameter, and its value changes everytime we submit the form. This parameter is hidden, as you can see in the form’s HTML :

CSRF stands for Cross Site Request Forgery. The token is generated by the server and is required in every form submissions / POST requests. Almost every website use this mechanism to prevent CSRF attack. You can learn more about CSRF attack here. Now let’s create our own POST request with HtmlUnit.
The first thing we need is to create a WebRequest object. Then we need to set the URL, the HTTP method, headers, and parameters. Adding request header to a WebRequest object is quite simple, all you need to to is to call the setAdditionalHeader method. Adding parameters to your request must me done with the setRequestParametersmethod, which takes a list of NameValuePair. As discussed earlier, we have to add the csrf_token to the parameters, which can be selected easily with this XPath expression : //form//input[@name="csrf_token"]
HtmlInput csrfToken = page.getFirstByXPath("//form//input[@name='csrf_token']") ;
WebRequest request = new WebRequest(
new URL("http://www.javawebscrapingsandbox.com/account/login"), HttpMethod.POST);
List<NameValuePair> params = new ArrayList<NameValuePair>();
params.add(new NameValuePair("csrf_token", csrfToken.getValueAttribute()));
params.add(new NameValuePair("email", email));
params.add(new NameValuePair("password", password));

request.setRequestParameters(params);
request.setAdditionalHeader("Content-Type", "application/x-www-form-urlencoded");
request.setAdditionalHeader("Accept-Encoding", "gzip, deflate");

page = client.getPage(request);
Case study: Hacker News authentication
Let’s say you want to create a bot that logs into a website (to submit a link or perform an action that requires being authenticated) :
Here is the login form and the associated DOM :

Now we can implement the login algorithm
public static WebClient autoLogin(String loginUrl, String login, String password)
throws FailingHttpStatusCodeException, MalformedURLException, IOException{
WebClient client = new WebClient();
client.getOptions().setCssEnabled(false);
client.getOptions().setJavaScriptEnabled(false);

HtmlPage page = client.getPage(loginUrl);

HtmlInput inputPassword = page.getFirstByXPath("
//input[@type='password']");
//The first preceding input that is not hidden
HtmlInput inputLogin = inputPassword.getFirstByXPath("
.//preceding::input[not(@type='hidden')]");

inputLogin.setValueAttribute(login);
inputPassword.setValueAttribute(password);

//get the enclosing form
HtmlForm loginForm = inputPassword.getEnclosingForm() ;

//submit the form
page = client.getPage(loginForm.getWebRequest(null));

//returns the cookie filled client :)
return client;
}
Then the main method, which :
-
calls
autoLoginwith the right parameters -
Go to
https://news.ycombinator.com -
Check the logout link presence to verify we’re logged
-
Prints the cookie to the console
public static void main(String[] args) {

String baseUrl = "https://news.ycombinator.com" ;
String loginUrl = baseUrl + "/login?goto=news" ;
String login = "login";
String password = "password" ;

try {
System.out.println("Starting autoLogin on " + loginUrl);
WebClient client = autoLogin(loginUrl, login, password);
HtmlPage page = client.getPage(baseUrl) ;

HtmlAnchor logoutLink = page
.getFirstByXPath(String.format(
"//a[@href='user?id=%s']", login)) ;

if(logoutLink != null ){
System.out.println("Successfuly logged in !");
// printing the cookies
for(Cookie cookie : client.
getCookieManager().getCookies()){
System.out.println(cookie.toString());
}
}else{
System.err.println("Wrong credentials");
}

} catch (Exception e) {
e.printStackTrace();
}
}
You can find the code in this Github repo
Go further
There are many cases where this method will not work: Amazon, DropBox… and all other two-steps/captcha-protected login forms.
Things that can be improved with this code :
File Upload
File upload is not something often used in web scraping. But it can be interesting to know how to upload files, for example if you want to test your own website or to automate some tasks on websites.
There is nothing complicated, here is a little form on the sandbox website (you need to be authenticated):
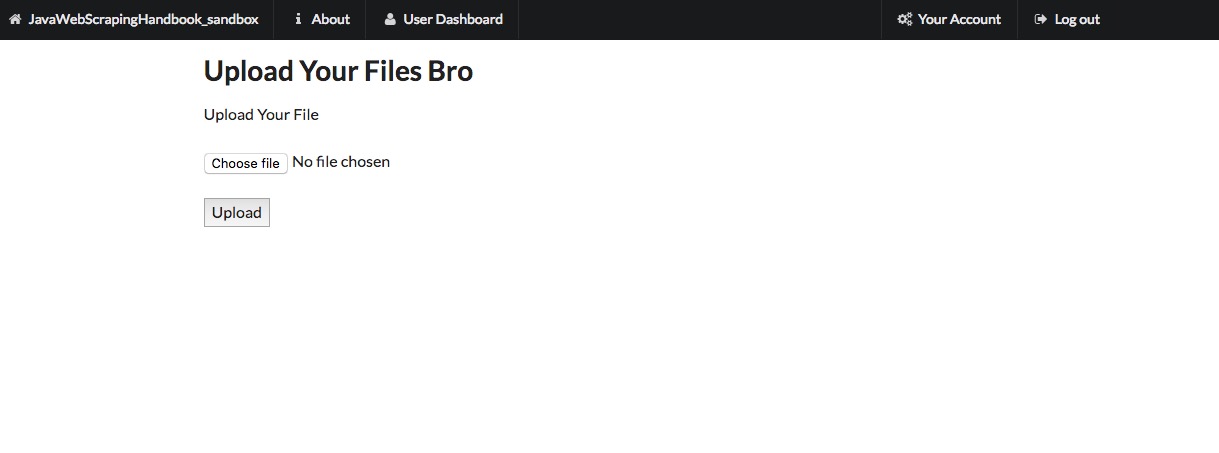
Here is the HTML code for the form :
<div class="ui text container">
<h1>Upload Your Files Broh1>

<form action="/upload_file" method="POST" enctype="multipart/form-data">

<label for="user_file">Upload Your Filelabel>
<br>br>
<input type="file" name="user_file">
<br>br>
<button type="submit">Uploadbutton>

form>
div>
As usual, the goal here is to select the form, if there is a name attribute you can use the method getFormByName() but in this case there isn’t, so we will use a good old XPath expression. Then we have to select the input for the file and set our file name to this input. Note that you have to be authenticated to post this form.
fileName = "file.png" ;
page = client.getPage(baseUrl + "upload_file") ;
HtmlForm uploadFileForm = page.getFirstByXPath("//form[@action='/upload_file']");
HtmlFileInput fileInput = uploadFileForm.getInputByName("user_file");

fileInput.setValueAttribute(fileName);
fileInput.setContentType("image/png");

HtmlElement button = page.getFirstByXPath("//button");
page = button.click();

if(page.asText().contains("Your file was successful uploaded")){
System.out.println("File successfully uploaded");
}else{
System.out.println("Error uploading the file");
}
Other forms
Search Forms
Another common need when doing web scraping is to submit search forms. Websites having a large database, like marketplaces often provide a search form to look for a specific set of items.
There is generally three different ways search forms are implemented :
- When you submit the form, a POST request is sent to the server
- A GET request is sent with query parameters
- An AJAX call is made to the server
As an example, I’ve set up a search form on the sandbox website :
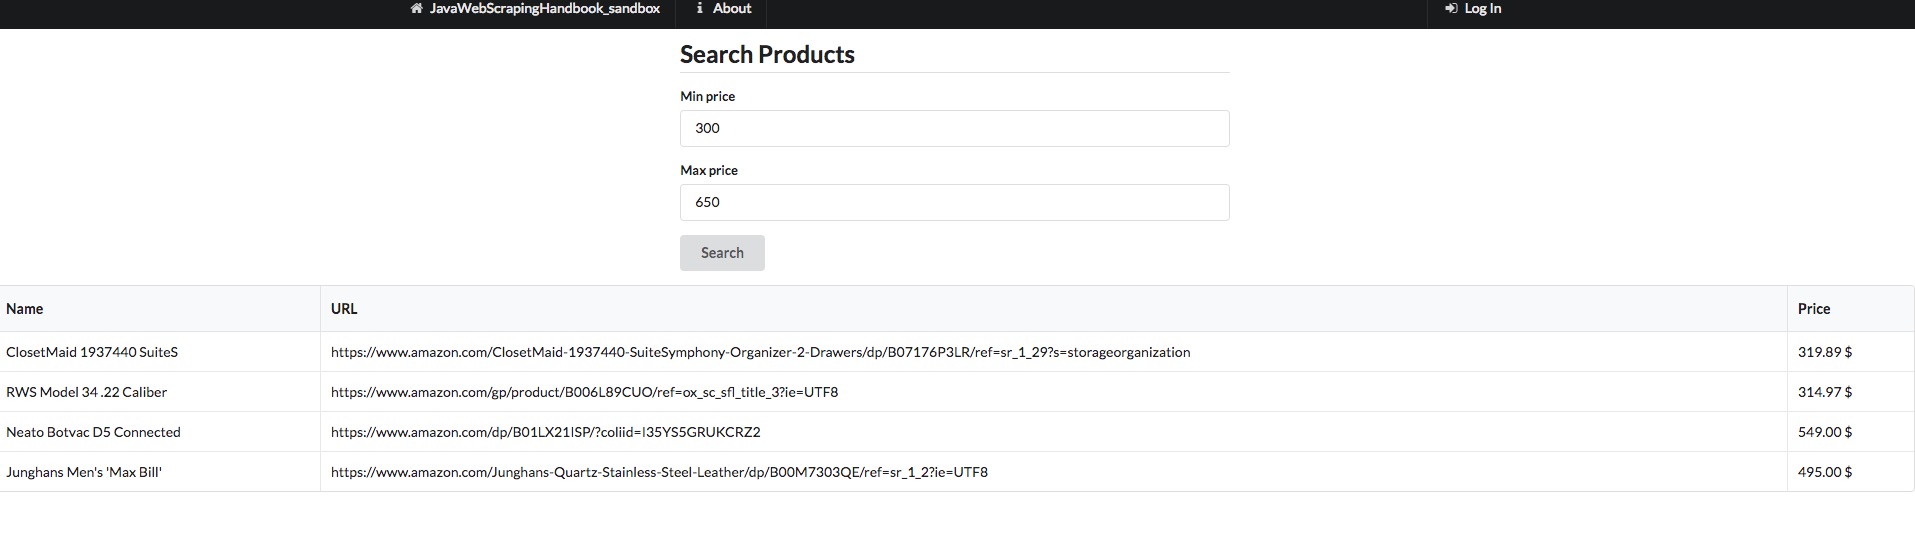
It is a simple form, there is nothing complicated. As usual, we have to select the inputs field, fill it with the values we want, and submit the form. We could also reproduce the POST request manually, as we saw in the beginning of the chapter. When the server sends the response back, I chose to loop over the result, and print it in the console (The whole code is available in the repo as usual.)
HtmlPage page = client.getPage(baseUrl + "product/search");

HtmlInput minPrice = page.getHtmlElementById("min_price");
HtmlInput maxPrice = page.getHtmlElementById("max_price");

// set the min/max values
minPrice.setValueAttribute(MINPRICE);
maxPrice.setValueAttribute(MAXPRICE);
HtmlForm form = minPrice.getEnclosingForm();

page = client.getPage(form.getWebRequest(null));

HtmlTable table = page.getFirstByXPath("//table");
for(HtmlTableRow elem : table.getBodies().get(0).getRows()){
System.out.println(String.format("Name : %s Price: %s", elem.getCell(0).asText(), elem.getCell(2).asText()));
}
And here is the result:
Name : ClosetMaid 1937440 SuiteS Price: 319.89 $
Name : RWS Model 34 .22 Caliber Price: 314.97 $
Name : Neato Botvac D5 Connected Price: 549.00 $
Name : Junghans Men's 'Max Bill' Price: 495.00 $
Basic Authentication
In the 90s, basic authentication was everywhere. Nowadays, it’s rare, but you can still find it on corporate websites. It’s one of the simplest forms of authentication. The server will check the credentials in the Authorization header sent by the client, or issue a prompt in case of a web browser.
If the credentials are not correct, the server will respond with a 401 (Unauthorized) response status.
Here is the URL on the sandbox website : https://www.javawebscrapingsandbox.com/basic_auth
The Username is : basic
The password is : auth
It’s really simple to use basic auth with HtmlUnit, all you have to do is format your URL with this pattern : https://username:password@www.example.com
HtmlPage page = client.getPage(String.format("https://%s:%s@www.javawebscrapingsandbox.com/basic_auth", username, password));
System.out.println(page.asText());
4. Dealing with Javascript
Dealing with a website that uses lots of Javascript to render their content can be tricky. These days, more and more sites are using frameworks like Angular, React, Vue.js for their frontend. These frontend frameworks are complicated to deal with because there are often using the newest features of the HTML5 API, and HtmlUnit and other headless browsers do not commonly support these features.
So basically the problem that you will encounter is that your headless browser will download the HTML code, and the Javascript code, but will not be able to execute the full Javascript code, and the webpage will not be totally rendered.
There are some solutions to these problems. The first one is to use a better headless browser. And the second one is to inspect the API calls that are made by the Javascript frontend and to reproduce them.
Javascript 101
Javascript is an interpreted scripting language. It’s more and more used to build “Web applications” and “Single Page Applications”.
The goal of this chapter is not to teach you Javascript, to be honest, I’m a terrible Javascript developer, but I want you to understand how it is used on the web, with some examples.
The Javascript syntax is similar to C or Java, supporting common data types, like Boolean, Number, String, Arrays, Object… Javascript is loosely typed, meaning there is no need to declare the data type explicitly.
Here is some code examples:
function plusOne(number) {
    return number + 1 ;
}
var a = 4 ;
var b = plusOne(a) ;
console.log(b);
// will print 5 in the console
As we saw in chapter 2, Javascript is mainly used on the web to modify the DOM dynamically and perform HTTP requests. Here is a sample code that use a stock API to retrieve the latest Apple stock price when clicking a button:
<html>
<head>
    <script>
    function refreshAppleStock(){
      fetch("https://api.iextrading.com/1.0/stock/aapl/batch?types=quote,news,chart&range=1m&last=10")
        .then(function(response){
          return response.json();
        }).then(function(data){
           document.getElementById('my_cell').innerHTML = '$' + data.quote.latestPrice ;
        });
    }
  script>
head>
<body>
  <div>
    <h2>Apple stock price:h2>
    <div id="my_cell">
    div>
    <button id="refresh" onclick="refreshAppleStock()">Refreshbutton>
  div>
body>
html>
Jquery
jQuery is one of the most used Javascript libraries. It’s really old, the first version was written in 2006, and it is used for lots of things such as:
- DOM manipulation
- AJAX calls
- Event handling
- Animation
- Plugins (Datepicker etc.)
Here is a jQuery version of the same apple stock code (you can note that the jQuery version is not necessarily clearer than the vanilla Javascript one…) :
<html>
<head>
  <script src="https://ajax.googleapis.com/ajax/libs/jquery/3.2.1/jquery.min.js">script>
    <script>
    function refreshAppleStock(){
      $.get("https://api.iextrading.com/1.0/stock/aapl/batch?types=quote,news,chart&range=1m&last=10", function(data, status) {
          $('#my_cell').html('$' + data.quote.latestPrice);
      });
    }

    $(document).ready(function(){
      $("#refresh").click(function(){
          refreshAppleStock();
      });
    });

  script>
head>
<body>
  <div>
    <h2>Apple stock price:h2>
    <div id="my_cell">
    div>
    <button id="refresh">Refreshbutton>
  div>

body>
html>
If you want to know more about Javascript, I suggest you this excellent book: Eloquent Javascript
Modern Javascript frameworks
There are several problems with jQuery. It is extremely difficult to write clean/maintainable code with it as the Javascript application growths. Most of the time, the codebase becomes full of “glue code”, and you have to be careful with each id or class name changes. The other big concern is that it can be complicated to implement data-binding between Javascript models and the DOM.
The other problem with the traditional server-side rendering is that it can be inefficient. Let’s say you are browsing a table on an old website. When you request the next page, the server is going to render the entire HTML page, with all the assets and send it back to your browser. With an SPA, only one HTTP request would have been made, the server would have sent back a JSON containing the data, and the Javascript framework would have filled the HTML model it already has with the new values!
Here is a diagram to better understand how it works :
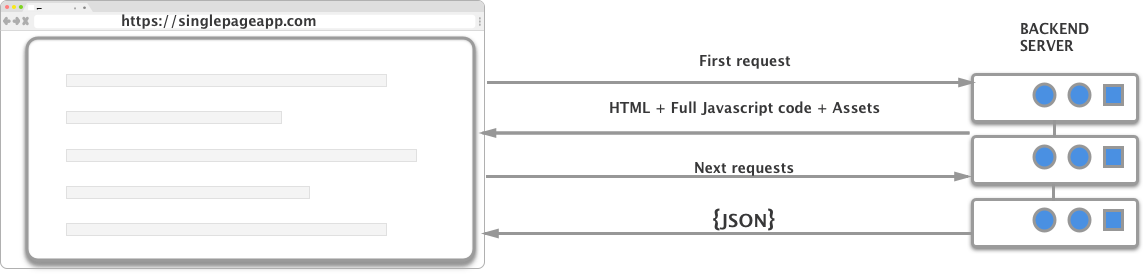
In theory, SPAs are faster, have better scalability and lots of other benefits compared to server-side rendering.
That’s why Javascript frameworks were created. There are lots of different Javascript frameworks :
These frameworks are often used to create so-called “Single Page Applications”. There are lots of differences between these, but it is out of this book scope to dive into it.
It can be challenging to scrape these SPAs because there are often lots of Ajax calls and websockets connections involved. If performance is an issue, you should always try to reproduce the Javascript code, meaning manually inspecting all the network calls with your browser inspector, and replicating the AJAX calls containing interesting data.
So depending on what you want to do, there are several ways to scrape these websites. For example, if you need to take a screenshot, you will need a real browser, capable of interpreting and executing all the Javascript code, that is what the next part is about.
Headless Chrome
We are going to introduce a new feature from Chrome, the headless mode. There was a rumor going around, that Google used a special version of Chrome for their crawling needs. I don’t know if this is true, but Google launched the headless mode for Chrome with Chrome 59 several months ago.
PhantomJS was the leader in this space, it was (and still is) heavy used for browser automation and testing. After hearing the news about Headless Chrome, the PhantomJS maintainer said that he was stepping down as maintainer, because I quote “Google Chrome is faster and more stable than PhantomJS […]” It looks like Chrome headless is becoming the way to go when it comes to browser automation and dealing with Javascript-heavy websites.
HtmlUnit, PhantomJS, and the other headless browsers are very useful tools, the problem is they are not as stable as Chrome, and sometimes you will encounter Javascript errors that would not have happened with Chrome.
Prerequisites
- Google Chrome > 59
- Chromedriver
- Selenium
- In your pom.xml add a recent version of Selenium :
If you don’t have Google Chrome installed, you can download it here To install Chromedriver you can use brew on MacOS :
brew install chromedriver
You can also install Chrome driver with npm:
npm install chromedriver
Or download it using the link below. There are a lot of versions, I suggest you to use the last version of Chrome and chromedriver.
Let’s take a screenshot of a real SPA
We are going to take a screenshot of the Coinbase website, which is a cryptocurrency exchange, made with React framework, and full of API calls and websocket !

We are going to manipulate Chrome in headless mode using the Selenium API. The first thing we have to do is to create a WebDriver object, whose role is similar the toe WebClient object with HtmlUnit, and set the chromedriver path and some arguments :
// Init chromedriver
String chromeDriverPath = "/Path/To/Chromedriver" ;
System.setProperty("webdriver.chrome.driver", chromeDriverPath);
ChromeOptions options = new ChromeOptions();
options.addArguments("--headless", "--disable-gpu", "--window-size=1920,1200","--ignore-certificate-errors");
WebDriver driver = new ChromeDriver(options);
The --disable-gpu option is needed on Windows systems, according to the documentation Chromedriver should automatically find the Google Chrome executable path, if you have a special installation, or if you want to use a different version of Chrome, you can do it with :
options.setBinary("/Path/to/specific/version/of/Google Chrome");
If you want to learn more about the different options, here is the Chromedriver documentation
The next step is to perform a GET request to the Coinbase website, wait for the page to load and then take a screenshot.
We have done this in a previous article, here is the full code :
public class ChromeHeadlessTest {
    private static String userName = "" ;
    private static String password = "" ;

    public static void main(String[] args) throws IOException{
      String chromeDriverPath = "/path/to/chromedriver" ;
System.setProperty("webdriver.chrome.driver", chromeDriverPath);
ChromeOptions options = new ChromeOptions();
        options.addArguments("--headless", "--disable-gpu", "--window-size=1920,1200","--ignore-certificate-errors", "--silent");
        WebDriver driver = new ChromeDriver(options);

        // Get the login page
        driver.get("https://pro.coinbase.com/trade/BTC-USD");
        Thread.sleep(10000);

        // Take a screenshot of the current page
        File screenshot = ((TakesScreenshot) driver).getScreenshotAs(OutputType.FILE);
        FileUtils.copyFile(screenshot, new File("screenshot.png"));
        driver.close();
    driver.quit();
   }
}
You should now have a nice screenshot of the Coinbase homepage.
Several things are going on here. The line with the Thread.sleep(10000) allows the browser to wait for the entire page to load. This is not necessarily the best method, because maybe we are waiting too long, or too little depending on multiple factors (your own internet connection, the target website speed etc.).
This is a common problem when scraping SPAs, and one way I like to solve this is by using the WebDriverWait object:
WebDriverWait wait = new WebDriverWait(driver, 20);
wait.until(ExpectedConditions.
    presenceOfElementLocated(By.xpath("/path/to/element")));
There are lots of different ExpectedConditions you can find the documentation here I often use ExpectedConditions.visibilityOfAllElementsLocatedBy(locator) because the element can be present, but hidden until the asynchronous HTTP call is completed.
This was a brief introduction to headless Chrome and Selenium, now let’s see some common and useful Selenium objects and methods!
Selenium API
In the Selenium API, almost everything is based around two interfaces :
WebDriverwhich is the HTTP clientWebElementwhich represents a DOM object
The WebDriver can be initialized with almost every browser, and with different options (and of course, browser-specific options) such as the window size, the logs file’s path etc.
Here are some useful methods :
| Method | Description |
|---|---|
driver.get(URL) |
performs a GET request to the specified URL |
driver.getCurrentUrl() |
returns the current URL |
driver.getPageSource() |
returns the full HTML code for the current page |
driver.navigate().back() |
navigate one step back in the history, works with forward too |
driver.switchTo().frame(frameElement) |
switch to the specified iFrame |
driver.manage().getCookies() |
returns all cookies, lots of other cookie related methods exists |
driver.quit() |
quits the driver, and closes all associated windows |
driver.findElement(by) |
returns a WebElement located by the specified locator |
The findElement() method is one of the most interesting for our scraping needs.
You can locate elements with different ways :
findElement(By.Xpath('/xpath/expression'))findElement(By.className(className)))findElement(By.cssSelector(selector)))
Once you have a WebElement object, there are several useful methods you can use:
| Method | Description |
|---|---|
findElement(By) |
you can again use this method, using a relative selector |
click() |
clicks on the element, like a button |
getText() |
returns the inner text (meaning the text that is inside the element) |
sendKeys('some string') |
enters some text in an input field |
getAttribute('href') |
returns the attribute’s value(in this example, the href attribute) |
Infinite scroll
Infinite scroll is heavily used in social websites, news websites, or when dealing with a lot of information. We are going to see three different ways to scrape infinite scroll.
I’ve set up a basic infinite scroll here: Infinite Scroll Basically, each time you scroll near the bottom of the page, an AJAX call is made to an API and more elements are added to the table.
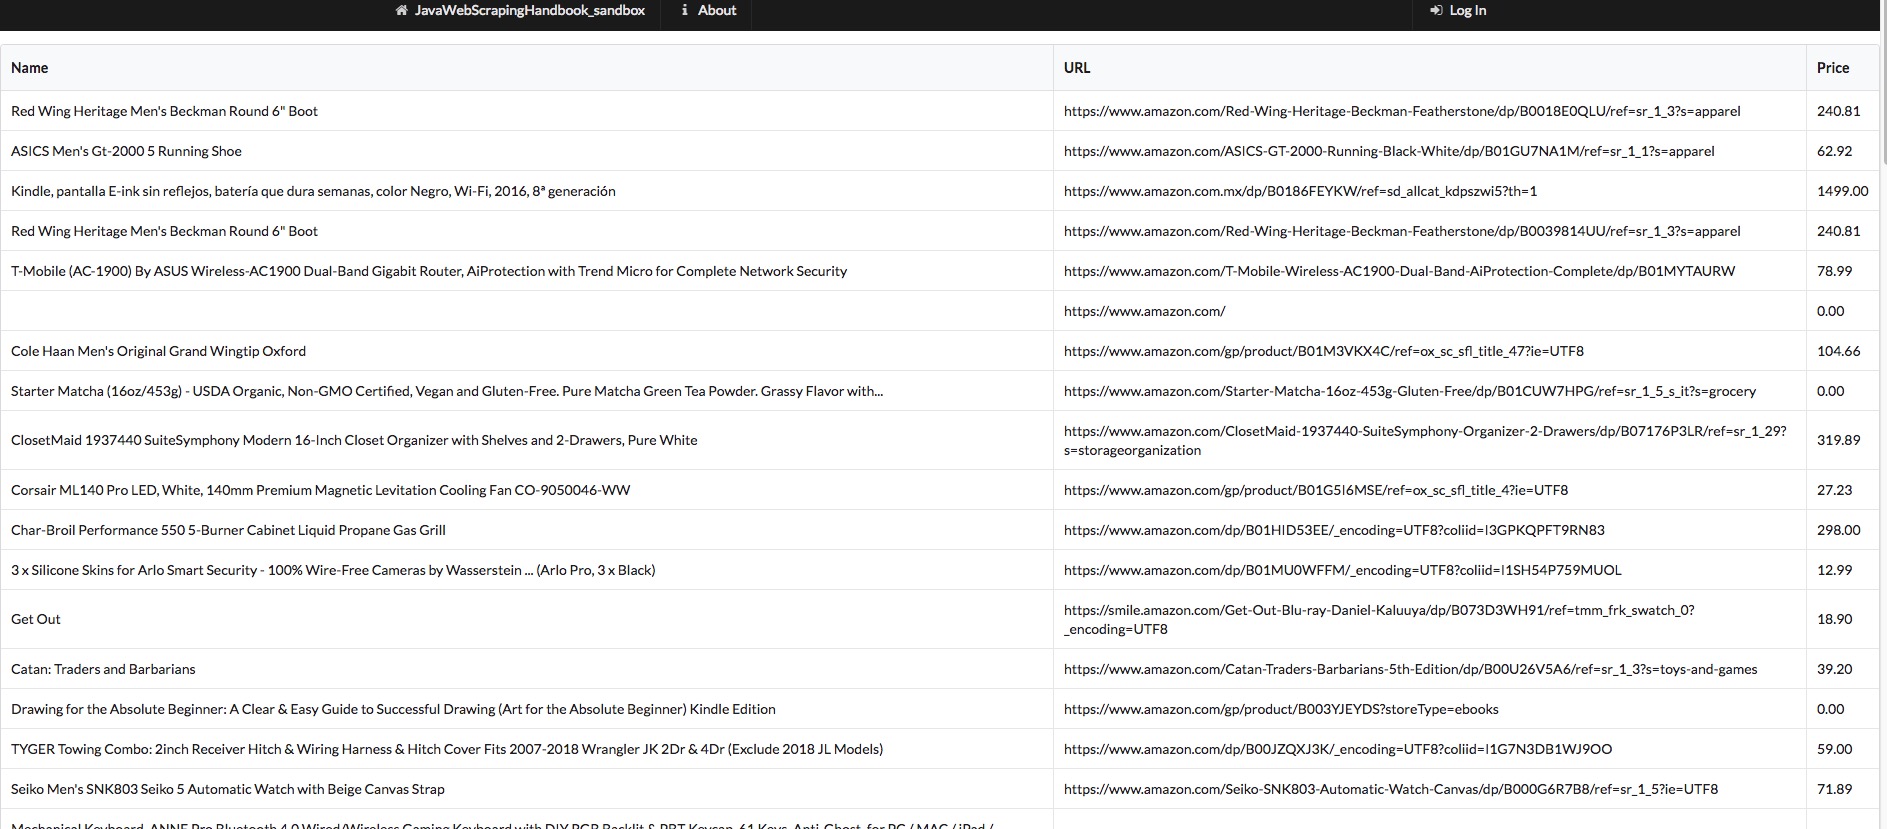
Scrolling to the bottom
The first way of scraping this page is to make our headless browser scroll to the bottom of the page. There is a nice method we can use on the Window object, called ScrollTo(). It is really simple to use, you give it an X and Y coordinate, and it will scroll to that location.
In order to execute this Javascript code, we are going to use a Javascript executor. It allows us to execute any Javascript code in the context of the current web page (or more specifically, the current tab). It means we have access to every Javascript function and variables defined in the current page.
In this example, note that the webpage is showing a fixed 20 rows in the table on the first load. So if our browser window is too big, we won’t be able to scroll. This “mistake” was made on purpose. To deal with this, we must tell our headless Chrome instance to open with a small window size !
String chromeDriverPath = "/path/to/chromedriver" ;
System.setProperty("webdriver.chrome.driver", chromeDriverPath);
ChromeOptions options = new ChromeOptions();
options.addArguments("--headless" ,"--disable-gpu", "--ignore-certificate-errors", "--silent");
// REALLY important option here, you must specify a small window size to be able to scroll
options.addArguments("window-size=600,400");

WebDriver driver = new ChromeDriver(options);
JavascriptExecutor js = (JavascriptExecutor) driver;
int pageNumber = 5 ;

driver.get("https://www.javawebscrapingsandbox.com/product/infinite_scroll");
for(int i = 0; i < pageNumber; i++){
    js.executeScript("window.scrollTo(0, document.body.scrollHeight);");
    // There are better ways to wait, like using the WebDriverWait object
    Thread.sleep(1200);
}
List<WebElement> rows = driver.findElements(By.xpath("//tr"));

// do something with the row list
processLines(rows);

driver.quit();
Executing a Javascript function
The second way of doing this, is inspecting the Javascript code to understand how the infinite scroll is built, to do this, as usual, right click + inspect to open the Chrome Dev tools, and find the tag that contains the Javascript code:
$(document).ready(function() {
var win = $(window);
var page = 1 ;
var apiUrl = '/product/api/' + page ;

// Each time the user scrolls

var updatePage = function(){
    apiUrl = apiUrl.replace(String(page), "");
    page = page + 1;
    apiUrl = apiUrl + page;
}
var drawNextLines = function(url){
    win.data('ajaxready', false);
    $.ajax({
            url: url,
            dataType: 'json',
            success: function(json) {
                for(var i = 0; i < json.length; i++){
                    var tr = document.createElement('tr');
                    var tdName = document.createElement('td');
                    var tdUrl = document.createElement('td');
                    var tdPrice = document.createElement('td');

                    tdName.innerText = json[i].name;
                    tdUrl.innerText = json[i].url ;
                    tdPrice.innerText = json[i].price;

                    tr.appendChild(tdName);
                    tr.appendChild(tdUrl);
                    tr.appendChild(tdPrice);

                    var table = document.getElementById('table');
                    table.appendChild(tr);

                }
                win.data('ajaxready', true);
                if(url !== '/product/api/1' && url !== '/product/api/2'){
                    updatePage();
                }

                $('#loading').hide();
            }
        });
}

drawNextLines('/product/api/1');
drawNextLines('/product/api/2');

page = 3 ;
apiUrl = '/product/api/3';

// need to update the "ajaxready" variable not to fire multiple ajax calls when scrolling like crazy
win.data('ajaxready', true).scroll(function() {
    // End of the document reached?
    if (win.data('ajaxready') == false) return;

    // fire the ajax call when we are about to "touch" the bottom of the page
    // no more data past 20 pages
    if (win.scrollTop() + win.height() > $(document).height() - 100 && page < 20) {
        $('#loading').show();
        drawNextLines(apiUrl);

    }
});
});
You don’t have to understand everything there, the only information that is interesting is that each time we scroll near the bottom of the page (100 pixels to be precise) the drawNextLines() function is called. It takes one argument, a URL with this pattern /product/api/:id which will return 10 more rows.
Let’s say we want 50 more rows on our table. Basically we only have to make a loop and call drawNextLines() five times. If you look closely at the Javascript code, when the AJAX call is loading, we set the variable ajaxready to false. So we could check the status of this variable, and wait until it is set to true.
JavascriptExecutor js = (JavascriptExecutor) driver;
int pageNumber = 5 ;

driver.get("https://www.javawebscrapingsandbox.com/product/infinite_scroll");
// we start at i=3 because on the first load, /product/api/1 and /product/api/2 have already been called.
for(int i = 3; i < pageNumber + 3; i++){
    js.executeScript("drawNextLines('/product/api/" + i +"');");
    while((Boolean)js.executeScript("return win.data('ajaxready');") == false){
        Thread.sleep(100);
    }
}
List<WebElement> rows = driver.findElements(By.xpath("//tr"));

// do something with the rows
processLines(rows);
The “best” way
My favorite way of scraping website using AJAX is to make the HTTP calls to the REST API endpoint directly. In this case, it’s pretty easy to understand what API to call, because the Javascript code is straightforward, but sometimes it can be more complicated. A good method is to open the Chrome Dev tools, and look what’s happening in the “network” tab.
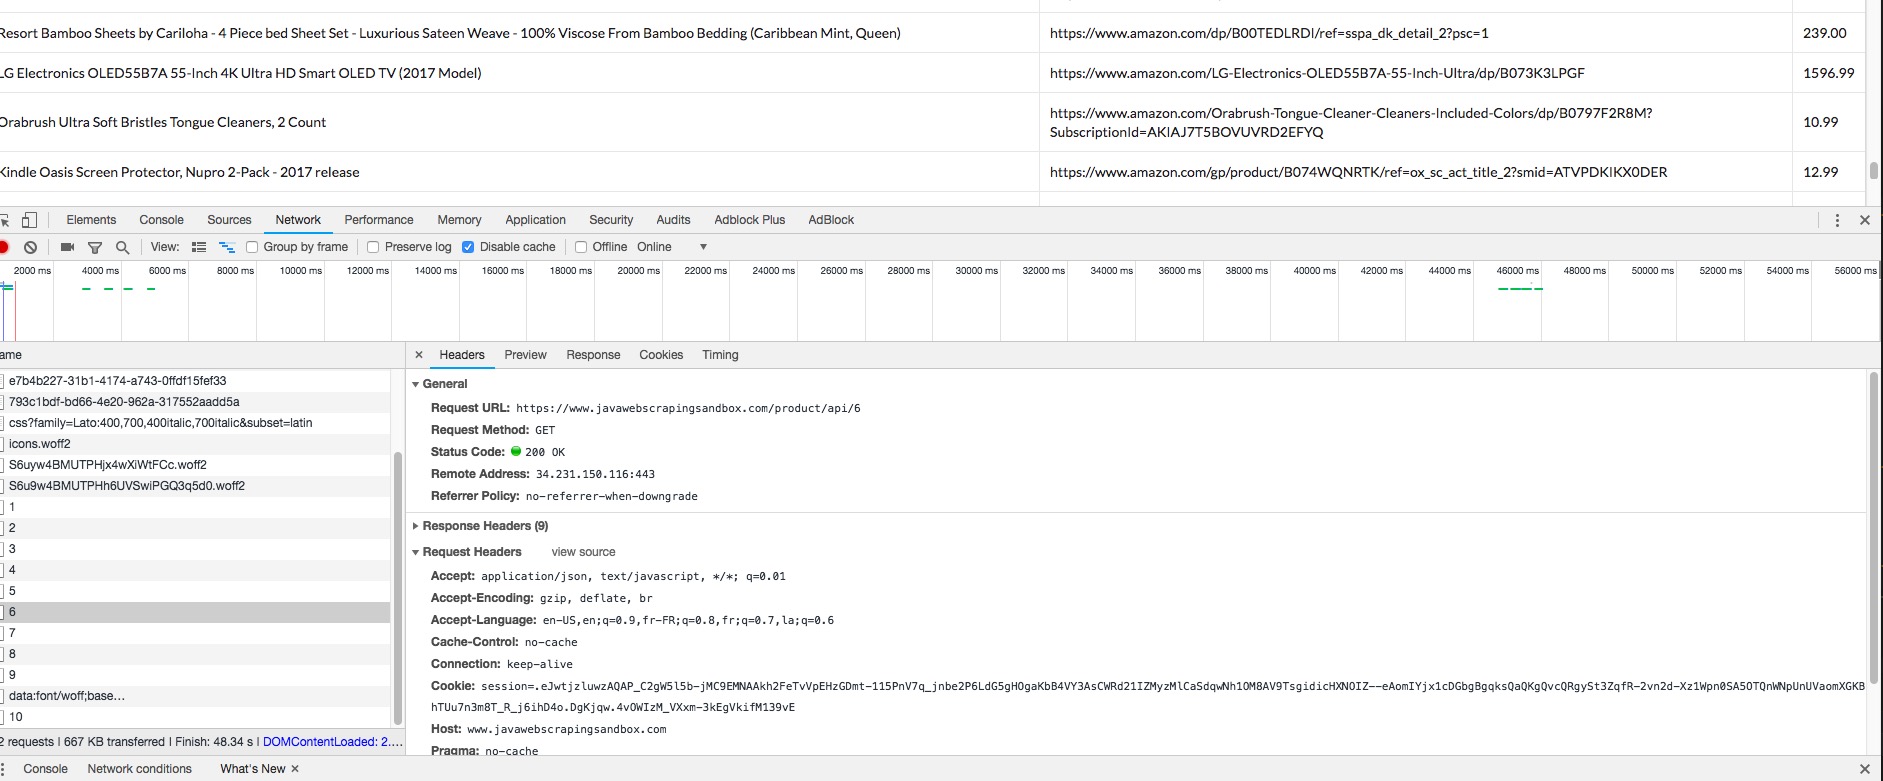
We can clearly see the API URl being called, and what the response looks like. Then we can use HtmlUnit or any other HTTP client to perform the requests we want, and parse the JSON response with the Jackson library for example.
Let’s say we want the 50 first rows :
WebClient client = new WebClient();
client.getOptions().setJavaScriptEnabled(false);
client.getOptions().setCssEnabled(false);
client.getOptions().setUseInsecureSSL(true);
java.util.logging.Logger.getLogger("com.gargoylesoftware").setLevel(Level.OFF);

for(int i = 1; i < 5; i++){
    Page json = client.getPage("https://www.javawebscrapingsandbox.com/product/api/" + i );
    parseJson(json.getWebResponse().getContentAsString());
}
The API responds with a JSON array, like this one:
[
    {
        id: 31,
        name: "Marmot Drop Line Men's Jacket, Lightweight 100-Weight Sweater Fleece",
        price: "74.96",
        url: "https://www.amazon.com/gp/product/B075LC96R2/ref=ox_sc_sfl_title_39?ie=UTF8"
    },
    {
        id: 32,
        name: "ASUS ZenPad 3S 10 9.7" (2048x1536), 4GB RAM, 64GB eMMC, 5MP Front / 8MP Rear Camera, Android 6.0, Tablet, Titanium Gray (Z500M-C1-GR)",
        price: "296.07",
        url: "https://www.amazon.com/dp/B01MATMXZV?tag=thewire06-20"
    },
    {
        id: 33,
        name: "LG Electronics OLED65C7P 65-Inch 4K Ultra HD Smart OLED TV (2017 Model)",
        price: "2596.99",
        url: "https://www.amazon.com/gp/product/B01NAYM1TP/ref=ox_sc_sfl_title_35?ie=UTF8"
    },
    ...
]
Here is a simple way to parse this JSON array, loop over every element and print it to the console. In general, we don’t want to do this, maybe you want to export it to a CSV file, or save it into a database…
public static void parseJson(String jsonString) throws JsonProcessingException, IOException{
    ObjectMapper mapper = new ObjectMapper();
    JsonNode rootNode = mapper.readTree(jsonString);
    Iterator<JsonNode> elements = rootNode.elements();
    while(elements.hasNext()){
        JsonNode node = elements.next();
        Long id = node.get("id").asLong();
        String name = node.get("name").asText();
        String price = node.get("price").asText();
        System.out.println(String.format("Id: %s - Name: %s - Price: %s", id, name, price));
    }
}
Here are some tips when working with JS rendered web pages:
- Try to find the hidden API using the network pane in Chrome Dev Tools
- Try to disable Javascript in your web browser, some websites switch to a server-side rendering in this case.
- Look for a mobile version of the target website, the UI is generally easier to scrape. You can check this using your own phone. If it works without redirecting to a mobile URL (like https://m.example.com or https://mobile.example.com) try to spoof the “User-Agent” request header in your request
- If the UI is tough to scrape, with lots of edge cases, look for Javascript variable in the code, and access the data directly using the Selenium Javascript Executor to evaluate this variable, as we saw earlier.
5. Captcha solving, PDF parsing, and OCR
In this blog post we are going to how you can solve captcha, and why you should probably avoid them in the first place.
Captcha solving
Completely Automated Public Turing test to tell Computers and Humans Apart is what captcha stands for. Captchas are used to prevent bots/scripts from accessing and performing actions on website or applications. There are dozens of different captcha types, but you should have seen at least these two:
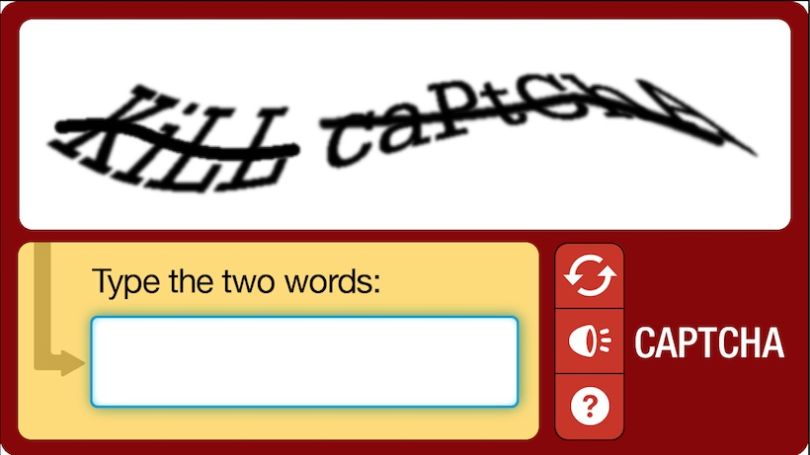
And this one:
The last one is the most used captcha mechanism, Google ReCaptcha v2. That’s why we are going to see how to “break” these captchas.
The only thing the user has to do is to click inside the checkbox. The service will then analyze lots of factors to determine if it a real user, or a bot. We don’t know exactly how it is done, Google didn’t disclose this for obvious reasons, but a lot of speculations has been made:
- Clicking behavior analysis: where did the user click ? Cursor acceleration etc.
- Browser fingerprinting
- Click location history (do you always click straight on the center, or is it random, like a normal user)
- Browser history and cookies
For old captchas like the first one, Optical Caracter Recognition and recent machine-learning frameworks offer an excellent solving accuracy (sometimes better than Humans…) but for Recaptcha v2 the easiest and more accurate way is to use third-party services.
Many companies are offering Captcha Solving API that uses real human operators to solve captchas, I don’t recommend one in particular, but I have found 2captcha.com easy to use, reliable, but unfortunately expensive(it is $2.99 for 1000 captchas).
Under the hood, 2captcha and other similar APIs need the specific site-key and the target website URL, with this information they are able to get a human operator to solve the captcha.
Technically the Recaptcha challenge is an iFrame with some magical Javascript code and some hidden input. When you “solve” the challenge, by clicking or solving an image problem, the hidden input is filled with a valid token.
It is this token that interests us, and 2captcha API will send it back. Then we will need to fill the hidden input with this token and submit the form.
The first thing you will need to do is to create an account on 2captcha.com and add some fund.
You will then find your API key on the main dashboard.
As usual, I have set up an example webpage with a simple form with one input and a Recaptcha to solve:
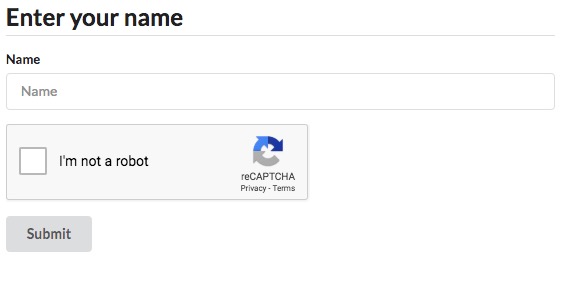
We are going to use Chrome in headless mode to post this form and HtmlUnit to make the API calls to 2captcha (we could use any other HTTP client for this). Now let’s code.
final String API_KEY = "YOUR_API_KEY" ;
final String API_BASE_URL = "http://2captcha.com/" ;
final String BASE_URL = "https://www.javawebscrapingsandbox.com/captcha";

WebClient client = new WebClient();
client.getOptions().setJavaScriptEnabled(false);
client.getOptions().setCssEnabled(false);
client.getOptions().setUseInsecureSSL(true);
java.util.logging.Logger.getLogger("com.gargoylesoftware").setLevel(Level.OFF);

// replace with your own chromdriver path
final String chromeDriverPath = "/usr/local/bin/chromedriver" ;
System.setProperty("webdriver.chrome.driver", chromeDriverPath);
ChromeOptions options = new ChromeOptions();
options.addArguments("--headless", "--disable-gpu", "--window-size=1920,1200","--ignore-certificate-errors", "--silent");
options.addArguments("--user-agent=Mozilla/5.0 (X11; Linux x86_64) AppleWebKit/537.36 (KHTML, like Gecko) Ubuntu Chromium/60.0.3112.113 Chrome/60.0.3112.113 Safari/537.36");
WebDriver driver = new ChromeDriver(options);

driver.get(BASE_URL);
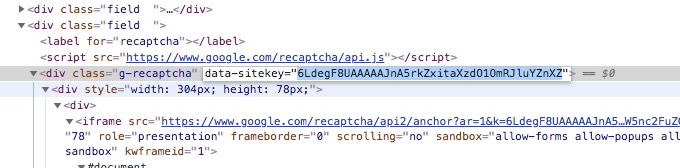
Here is some boilerplate code to instantiate both WebDriver and WebClient, along with the API URL and key. Then we have to call the 2captcha API with the site-key, your API key, and the website URL, as documented here. The API is supposed to respond with a strange format, like this one:OK|123456.
String siteId = "" ;
WebElement elem = driver.findElement(By.xpath("//div[@class='g-recaptcha']"));

try {
    siteId = elem.getAttribute("data-sitekey");
} catch (Exception e) {
    System.err.println("Catpcha's div cannot be found or missing attribute data-sitekey");
    e.printStackTrace();
}
String QUERY = String.format("%sin.php?key=%s&method=userrecaptcha&googlekey=%s&pageurl=%s&here=now",
        API_BASE_URL, API_KEY, siteId, BASE_URL);
Page response = client.getPage(QUERY);
String stringResponse = response.getWebResponse().getContentAsString();
String jobId = "";
if(!stringResponse.contains("OK")){
    throw new Exception("Error with 2captcha.com API, received : " + stringResponse);
}else{
    jobId = stringResponse.split("\|")[1];
}
Now that we have the job ID, we have to loop over another API route to know when the ReCaptcha is solved and get the token, as explained in the documentation. It returns CAPCHA_NOT_READY and still the weirdly formatted OK|TOKEN when it is ready:
boolean captchaSolved = false ;
while(!captchaSolved){
    response = client
        .getPage(String.format("%sres.php?key=%s&action=get&id=%s", API_BASE_URL, API_KEY, jobId));
    if (response.getWebResponse()
        .getContentAsString().contains("CAPCHA_NOT_READY")){
        Thread.sleep(3000);
        System.out.println("Waiting for 2Captcha.com ...");
    }else{
        captchaSolved = true ;
        System.out.println("Captcha solved !");
    }
}
String captchaToken = response.getWebResponse().getContentAsString().split("\|")[1];
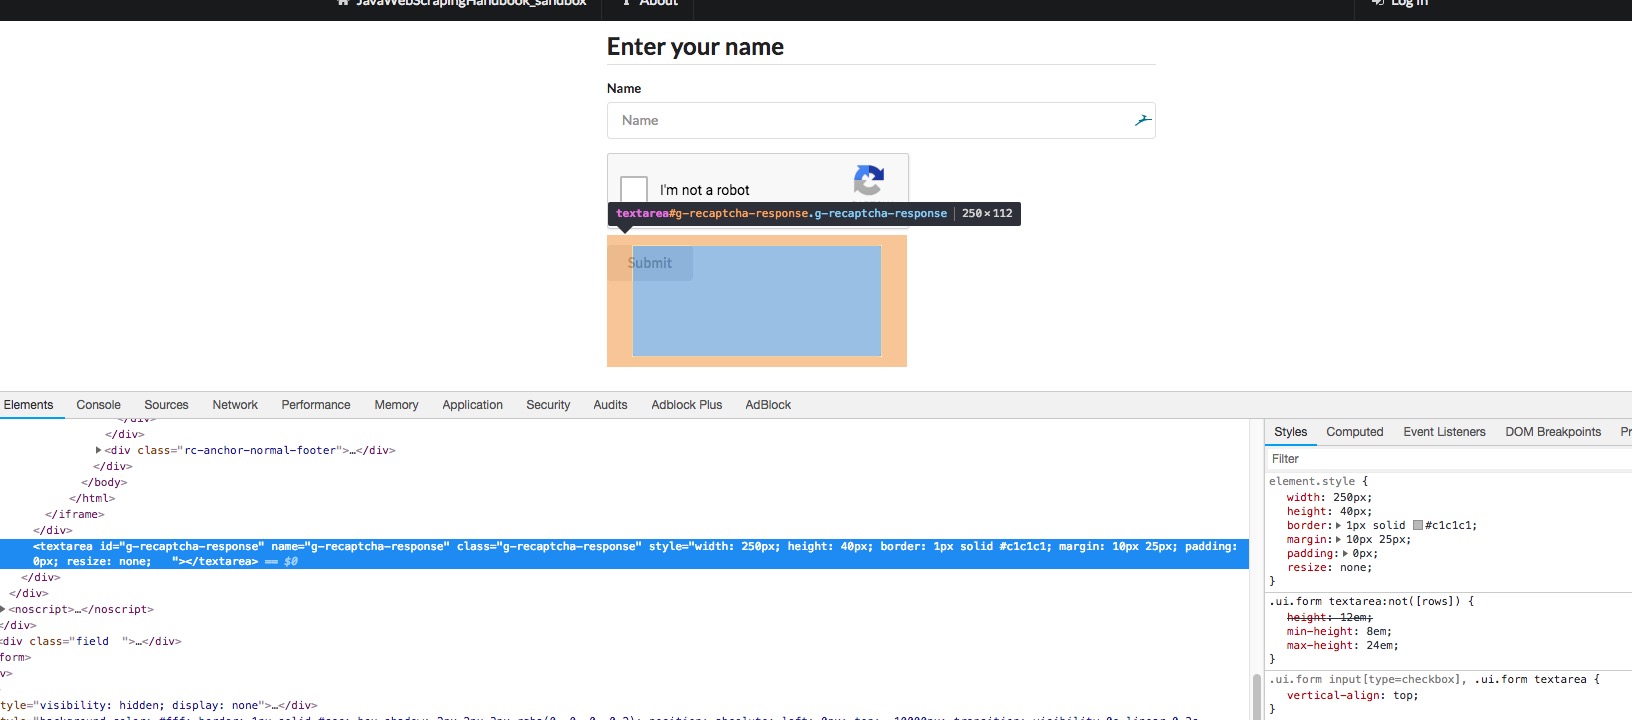
Note that it can take up to 1mn based on my experience. It could be a good idea to implement a safeguard/timeout in the loop because on rare occasions the captcha never gets solved. Now that we have the magic token, we just have to find the hidden input, fills it with the token, and submit the form. The selenium API cannot fill hidden input, so we have to manipulate the DOM to make the input visible, fills it, make it hidden again so that we can click on the submit button:
JavascriptExecutor js = (JavascriptExecutor) driver ;
js.executeScript("document
    .getElementById('g-recaptcha-response').style.display = 'block';");
WebElement textarea = driver.findElement(By
    .xpath("//textarea[@id='g-recaptcha-response']"));

textarea.sendKeys(captchaToken);
js.executeScript("document
    .getElementById('g-recaptcha-response').style.display = 'none';");
driver.findElement(By.id("name")).sendKeys("Kevin");
driver.getPageSource();
driver.findElement(By.id("submit")).click();

if(driver.getPageSource().contains("your captcha was successfully submitted")){
    System.out.println("Captcha successfuly submitted !");
}else{
    System.out.println("Error while submitting captcha");
}
And that’s it 🙂 Generally, websites don’t use ReCaptcha for each HTTP requests, but only for suspicious ones, or for specific actions like account creation, etc. You should always try to figure out if the website is showing you a captcha / Recaptcha because you made too many requests with the same IP address or the same user-agent, or maybe you made too many requests per second.
As you can see, “Recaptcha solving” is really slow and expensive ($3 for 1000 requests)so the best way to “solve” this problem is by avoiding catpchas in the first place ! In order to do so, we wrote an article about How to scrape websites without getting blocked check it out !
PDF parsing
Adobe created the Portable Document Format in the early 90s. It is still heavily used today for cross-platform document sharing. Lots of websites use PDF export for documents, bills, manuals… And maybe you are reading this eBook in the PDF format. It can be useful to know how to extract pieces of information from PDF files, and that is what we are going to see.
I made a simple page, with a link to a PDF invoice. The invoice looks like this:
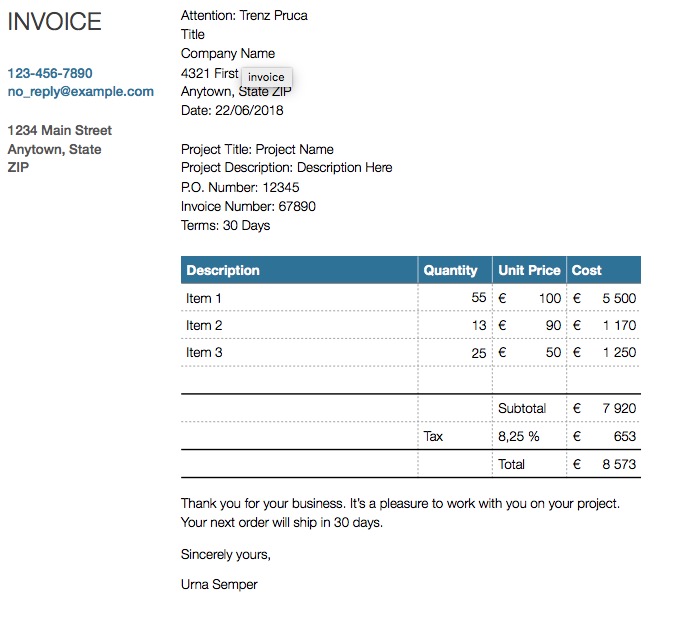
We are going to see how to download this PDF and extract information from it.
Prerequisites
We will need HtmlUnit to get the webpage and download the PDF, and PDFBox library to parse it.
Downloading the PDF
Downloading the PDF is simple, as usual:
- Go to the target URL
- Find the specific anchor
- Extract the download URL from the anchor
- Use the
Pageobject to get the PDF, since it is not an HTML page - Check the content type of what we just downloaded, to make sure that it is an
application/pdf - Copy the InputStream to a File
Here is the code:
HtmlPage html = client.getPage("https://www.javawebscrapingsandbox.com/pdf");

// selects the first anchor which contains "pdf"
HtmlAnchor anchor = html.getFirstByXPath("//a[contains(@href, 'pdf')]");
String pdfUrl = anchor.getHrefAttribute();

Page pdf = client.getPage(pdfUrl);

if(pdf.getWebResponse().getContentType().equals("application/pdf")){
    System.out.println("Pdf downloaded");
    IOUtils.copy(pdf.getWebResponse().getContentAsStream(),
            new FileOutputStream("invoice.pdf"));
    System.out.println("Pdf file created");
}
Parsing the PDF
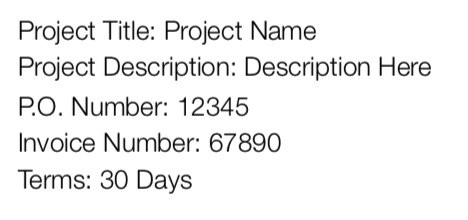
Now that we have the PDF file on disk, we can load it into PDFBox to extract the content as a String. We are going to extract the price from this invoice.
Once we have the text content from the PDF, it is easy to extract anything from it, using a regular expression. The text looks like this:
Title
Company Name
4321 First Street
Anytown, State ZIP
Date: 22/06/2018
Project Title: Project Name
Project Description: Description Here
P.O. Number: 12345
Invoice Number: 67890
Terms: 30 Days
Thank you for your business. It’s a pleasure to work with you on your project.

Your next order will ship in 30 days.
Sincerely yours,
Urna Semper
Description Quantity Unit Price Cost
Item 1 55 € 100 € 5 500
Item 2 13 € 90 € 1 170
Item 3 25 € 50 € 1 250
Subtotal € 7 920
Tax 8,25 % € 653
Total € 8 573
!1
INVOICE
123-456-7890
no_reply@example.com
1234 Main Street
Anytown, State
ZIP
COMPANY NAME
We just have to loop over each line, and use a regular expression with a capturing group like this one: "Total\s+€\s+(.+)" to extract the total price. We could extract everything we want with another regex, like the email address, the postal address, invoice number…
Here is the full code:
PDDocument document = null;
try{
    document = PDDocument.load(new File("invoice.pdf")) ;

    PDFTextStripperByArea stripper = new PDFTextStripperByArea();
    stripper.setSortByPosition(true);

    PDFTextStripper tStripper = new PDFTextStripper();

    String stringPdf = tStripper.getText(document);
    String lines[] = stringPdf.split("\n");
    String pattern = "Total\s+€\s+(.+)";
    Pattern p = Pattern.compile(pattern);
    String price = "";
    for (String line : lines) {
        Matcher m = p.matcher(line);
        if(m.find()){
            price = m.group(1);
        }
    }

    if(!price.isEmpty()){
        System.out.println("Price found: " + price);
    }else{
        System.out.println("Price not found");
    }
}finally{
    if(document != null){
        document.close();
    }
}
There are many methods in the PDFBox library, you can work with password protected PDF, extract specific text area, and many more, here is the documentation.
Optical Caracter Recognition
Now that we saw how to deal with PDF, we are going to see how to handle text inside images. Using text inside images is an obfuscation technique aimed to make the extraction difficult for bots. You can often find these techniques on blogs or marketplaces to “hide” an email address/phone number.
Extracting text from an image is called “Optical Caracter Recognition” or OCR. There are many OCR library available, but we are going to use Tesseract which is one of the best open source OCR library.
Installation
Installing Tesseract and all dependencies is really easy, on linux:
sudo apt install tesseract-ocr
sudo apt install libtesseract-dev
And on macOS:
More information about installing Tesseract with specific tags can be found here
Tesseract is written in C++, so we need some kind of Java bindings. We are going to use the http://bytedeco.org/ bindings:
Tesseract example
I took a screenshot of the previous PDF:
Let’s say we want to extract the invoice number.
The first thing is to locate your tessdata folder, it contains everything tesseract needs to recognize language specific characters. The location will vary depending on how you installed tesseract.
final static String TESS_DATA_PATH = "/path/to/tessdata" ;
Here is the full code:
BytePointer outText;
TessBaseAPI api = new TessBaseAPI();

if (api.Init(TESS_DATA_PATH, "ENG") != 0) {
    System.err.println("Could not initialize tesseract.");
    System.exit(1);
}

PIX image = lept.pixRead("ocr_exemple.jpg");
api.SetImage(image);

// Get OCR result
outText = api.GetUTF8Text();
String string = outText.getString();
String invoiceNumber = "" ;
for(String lines : string.split("\n")){
    if(lines.contains("Invoice")){
        invoiceNumber = lines.split("Invoice Number: ")[1];
        System.out.println(String.format("Invoice number found : %s", invoiceNumber));
    }
}

// Destroy used object and release memory
api.End();
outText.deallocate();
lept.pixDestroy(image);
This was just an example on how to use Tesseract for simple OCR, I’m not an expert on OCR and image processing, but here are some tips:
api.SetVariable("tessedit_char_whitelist", "0123456789,") to only include numerical characters. This will avoid confusion like l instead of 1 see the documentation for more informations about this.6. Stay under cover
In this chapter, we are going to see how to make our bots look like Humans. For various reasons, there are sometimes anti-bot mechanisms implemented on websites. The most obvious reason to protect sites from bots is to prevent heavy automated traffic to impact a website’s performance. Another reason is to stop bad behavior from bots like spam.
There are various protection mechanisms. Sometime your bot will be blocked if it does too many requests per second / hour / day. Sometimes there is a rate limit on how many requests per IP address. The most difficult protection is when there is a user behavior analysis. For example, the website could analyze the time between requests, if the same IP is making requests concurrently.
You won’t necessarily need all the advice in this chapter, but it might help you in case your bot is not working, or things don’t work in your Java code the same as it works with a real browser.
In Chapter 3 we introduced HTTP headers. Your browser includes systematically 6-7 headers, as you can see by inspecting a request in your browser network inspector:
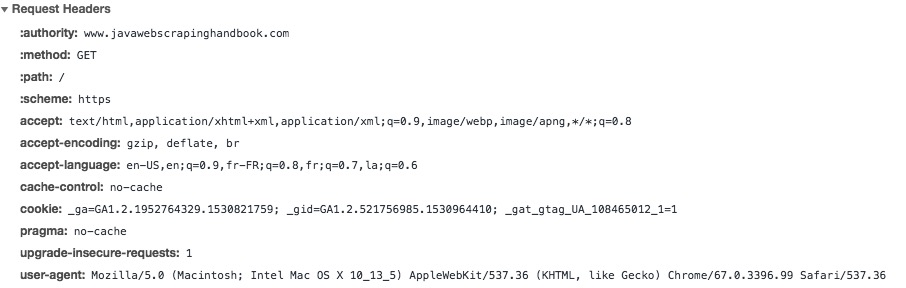
If you don’t send these headers in your requests, the target server can easily recognize that your request is not sent from a regular web browser. If the server has some kind of anti-bot mechanism, different things can happen:
- The HTTP response can change
- Your IP address could be blocked
- Captcha
- Rate limit on your requests
HtmlUnit provides a really simple way to customize our HTTP client’s headers
WebClient client = new WebClient();
client.addRequestHeader("Accept", "text/html,application/xhtml+xml,application/xml;q=0.9,image/webp,image/apng,*/*;q=0.8");
client.addRequestHeader("Accept-Encoding", "gzip, deflate, br");
client.addRequestHeader("Accept-Language", "en-US,en;q=0.9,fr-FR;q=0.8,fr;q=0.7,la;q=0.6");
client.addRequestHeader("Connection", "keep-alive");
client.addRequestHeader("Host", "ksah.in");
client.addRequestHeader("User-Agent", "Mozilla/5.0 (Macintosh; Intel Mac OS X 10_13_5) AppleWebKit/537.36 (KHTML, like Gecko) Chrome/67.0.3396.99 Safari/537.36");
client.addRequestHeader("Pragma", "no-cache");
We could go even further, and assign a random User-Agent to our WebClient. Randomizing user-agents will help a lot to hide our bot. A good solution is to create a list of common User-Agents and pick a random one.
You can find such a list here https://developers.whatismybrowser.com/useragents/explore/
We could create a file with a lot of different user agents:
Mozilla/5.0 (Windows NT 6.1; WOW64) AppleWebKit/535.1 (KHTML, like Gecko) Chrome/13.0.782.112 Safari/535.1
Mozilla/5.0 (Windows NT 6.0) AppleWebKit/535.1 (KHTML, like Gecko) Chrome/13.0.782.112 Safari/535.1
Mozilla/5.0 (Windows NT 6.1; WOW64) AppleWebKit/537.31 (KHTML, like Gecko) Chrome/26.0.1410.64 Safari/537.31
Mozilla/5.0 (Windows NT 6.1; WOW64) AppleWebKit/537.36 (KHTML, like Gecko) Chrome/27.0.1453.116 Safari/537.36
Mozilla/5.0 (Windows NT 6.1; WOW64) AppleWebKit/537.36 (KHTML, like Gecko) Chrome/27.0.1453.110 Safari/537.36
Mozilla/5.0 (Windows NT 6.1; WOW64) AppleWebKit/537.1 (KHTML, like Gecko) Chrome/21.0.1180.89 Safari/537.1
Mozilla/5.0 (Windows; U; Windows NT 6.1; en-US) AppleWebKit/532.2 (KHTML, like Gecko) Chrome/4.0.221.7 Safari/532.2
Mozilla/5.0 (Windows; U; Windows NT 5.1; en-US) AppleWebKit/525.13 (KHTML, like Gecko) Chrome/0.2.149.29 Safari/525.13
Mozilla/5.0 (Windows NT 5.1; rv:5.0.1) Gecko/20100101 Firefox/5.0.1
Mozilla/5.0 (Windows NT 6.1; rv:5.0) Gecko/20100101 Firefox/5.02
Mozilla/5.0 (Windows NT 6.1; WOW64; rv:5.0) Gecko/20100101 Firefox/5.0
Mozilla/5.0 (Windows NT 6.1; rv:2.0b7pre) Gecko/20100921 Firefox/4.0b7pre
Mozilla/5.0 (X11; U; Linux x86; fr-fr) Gecko/20100423 Ubuntu/10.04 (lucid) Firefox/3.6.3 AppleWebKit/532.4 Safari/532.4
Mozilla/5.0 (Windows; U; Windows NT 5.1; fr; rv:1.9.0.11) Gecko/2009060215 Firefox/3.0.11
Mozilla/5.0 (Windows; U; Windows NT 5.1; en-US; rv:1.9.1.3) Gecko/20090824 Firefox/3.5.3 GTB5
And then have a little helper method that reads this file, and returns a random user agent:
private static String getRandomUseragent(){
    List<String> userAgents = new ArrayList<String>();
    Random rand = new Random();
    try (BufferedReader br = new BufferedReader(new FileReader(FILENAME))) {
        String sCurrentLine;
        while ((sCurrentLine = br.readLine()) != null) {
            userAgents.add(sCurrentLine);
        }

    } catch (IOException e) {
        e.printStackTrace();
    }

    return userAgents.get(rand.nextInt(userAgents.size()));
}
We can then assign a random user agent to the WebClient instance:
client.addRequestHeader("User-Agent", getRandomUseragent());
Proxies
The easiest solution to hide our scrapers is to use proxies. In combination with random user-agent, using a proxy is a powerful method to hide our scrapers, and scrape rate-limited web pages. Of course, it’s better not be blocked in the first place, but sometimes websites allow only a certain amount of request per day / hour.
In these cases, you should use a proxy. There are lots of free proxy list, I don’t recommend using these because there are often slow, unreliable, and websites offering these lists are not always transparent about where these proxies are located. Sometimes the public proxy list is operated by a legit company, offering premium proxies, and sometimes not… What I recommend is using a paid proxy service, or you could build your own.
Setting a proxy to HtmlUnit is easy:
    ProxyConfig proxyConfig = new ProxyConfig("host", myPort);
    client.getOptions().setProxyConfig(proxyConfig);
Scrapoxy is a great open source API, allowing you to build a proxy API on top of different cloud providers.
 https://scrapoxy.io/”>
Scrapoxy creates a proxy pool by creating instances on various cloud providers (AWS, OVH, Digital Ocean). Then you will configure HtmlUnit or any HTTP client with the Scrapoxy URL, and it will automatically assign a proxy inside the proxy pool.
You can configure Scrapoxy to fit your needs, and set a minimum / maximum instance number, manage blacklisting of course, either within the configuration file, for example you could blacklist any proxy receiving a 503 HTTP response or programmaticaly with the REST API, in case the website blocks you with a Captcha, or a special web page.
TOR: The Onion Router
![]() https://www.torproject.org/”>
https://www.torproject.org/”>
TOR, also known as The Onion Router is a worldwide computer network designed to route traffic through many different servers to hide its origin. TOR usage makes network surveillance / traffic analysis very difficult. There are a lot of use cases for TOR usage, such as privacy, freedom of speech, journalists in dictatorship regime, and of course, illegal activities.
In the context of web scraping, TOR can hide your IP address, and change your bot’s IP address every 10 minutes. The TOR exit nodes IP addresses are public. Some websites block TOR traffic using a simple rule: if the server receives a request from one of TOR public exit node, it will block it. That’s why in many cases, TOR won’t help you, compared to classic proxies.
Using TOR is really easy, go to the download page, or using your package manager, on macOS:
brew install tor
Then you have to launch to TOR daemon, and set the proxy config for the WebClient
WebClient webClient = new WebClient();
ProxyConfig prc = new ProxyConfig("localhost", 9150, true);
webClient.getOptions().setProxyConfig(prc);
Tips
Cookies
Cookies are used for lots of reasons, as discussed earlier. If you find that the target website is responding differently with your bots, try to analyze the cookies that are set by client-side Javascript code and inject them manually. You could also use Chrome with the headless mode for better cookie handling.
Timing
If you want to hide your scrapers, you have to behave like a human. Timing is key. Humans don’t mass click on links 0.2 seconds after arriving to a web page. They don’t click on each link every 5 seconds too. Add some random time between your requests to hide your scrapers.
Fast scraping is not a good practice. You will get blocked, and if you do this on small websites it will put a lot of pressure on the website’s servers, it can even be illegal in some cases, as it can be considered like an attack.
Invisible elements
Invisible elements is a technique often used to detect bot accessing and crawling a website. Generally, one or more elements are hidden with CSS and there is some code that notifies the website’s server if there is a click on the element, or a request to a hidden link. Then the server will block the bot’s IP address.
A good way to avoid this trap is to use the isDisplayed() method with the Selenium API:
WebElement elem = driver.findElement(By.xpath("//div[@class='something']"));
if(elem.isDisplayed()){
    // do something
}
Another technique is to include hidden inputs in a form. If you have problems submitting a form that contains hidden inputs, make sure you include those inputs in your request, and don’t modify their value.
<form>
    <input type="hidden" name="itsatrap" value="value1"/>
    <input type="text" name="email"/>
    <input type="submit" value="Submit"/>
form>
7. Cloud scraping
Serverless
In this chapter, we are going to introduce serverless deployment for our bots. Serverless is a term referring to the execution of code inside ephemeral containers (Function As A Service, or FaaS). It is a hot topic in 2018, after the “micro-service” hype, here come the “nano-services”!
Cloud functions can be triggered by different things such as:
- An HTTP call to a REST API
- A job in message queue
- A log
- IOT event
Cloud functions are a really good fit for web scraping for many reasons. Web Scraping is I/O bound, most of the time is spent waiting for HTTP responses, so we don’t need high end CPU servers. Cloud functions are cheap and easy to setup. Cloud function are a good fit for parallel computing, we can create hundreds or thousands of function at the same time for large scale scraping.
Deploying an Azure function
 https://azure.microsoft.com/”>
We are going to deploy a scraper into Azure cloud function. I don’t have any preferred vendor, AWS Lambda is a great platform too. Google Cloud doesn’t support Java at the moment, only Node.js.
We are going to re-use the Hacker news scraper we built in chapter 3 and implement a little API on top of it, so that we will be able to call this API with a page parameter, and the function will return a JSON array of each hacker news item for this page number.
Prerequisites
You will need :
There are platform-specific instructions for each Azure component installation, I suggest you go through instructions carefully.
Once everything is installed on your system, make sure to log in with the Azure CLI:
az login
Creating, running and deploying a project
We are going to use a Maven archetype to create the project structure:
mvn archetype:generate
    -DarchetypeGroupId=com.microsoft.azure
    -DarchetypeArtifactId=azure-functions-archetype
Then Maven will ask you details about the project. The generated code is concise and straightforward:
public class Function {
    /**
     * This function listens at endpoint "/api/hello". Two ways to invoke it using "curl" command in bash:
     * 1. curl -d "HTTP Body" {your host}/api/hello
     * 2. curl {your host}/api/hello?name=HTTP%20Query
     */
    @FunctionName("hello")
    public HttpResponseMessage<String> hello(
            @HttpTrigger(name = "req", methods = {"get"}, authLevel = AuthorizationLevel.ANONYMOUS) HttpRequestMessage<Optional<String>> request,
            final ExecutionContext context) {
        context.getLogger().info("Java HTTP trigger processed a request.");

        // Parse query parameter
        String query = request.getQueryParameters().get("name");
        String name = request.getBody().orElse(query);

        if (name == null) {
            return request.createResponse(400, "Please pass a name on the query string or in the request body");
        } else {
            return request.createResponse(200, "Hello, " + name);
        }
    }
}
The generated code does not protect the API. The AuthorizationLevel.ANONYMOUS means anyone can call the route. To implement an authorization mechanism in your function, read the Azure documentation on the subject.
You can then test and run the generated code:
mvn clean package
mvn azure-functions:run
There might be some errors if you didn’t correctly install the previous requirements.
Deploying your Azure Function is as easy as:
mvn azure-functions:deploy
Azure will create a new URL for your function each time you deploy your app.
The first invocation will be very slow, it can sometimes take up to one minute. This “issue” is called cold start. The first time you invoke a function, or when you haven’t called a function for a “long” time (i.e several minutes), Azure has to :
- spin a server
- configure it
- load your function code and all the dependencies
and then it can run your code.
When the app is warm, it just has to run your code, and it will be much much faster. If the cold start is an issue for you, you can use the dedicated mode.
More information about this subject can be found here.
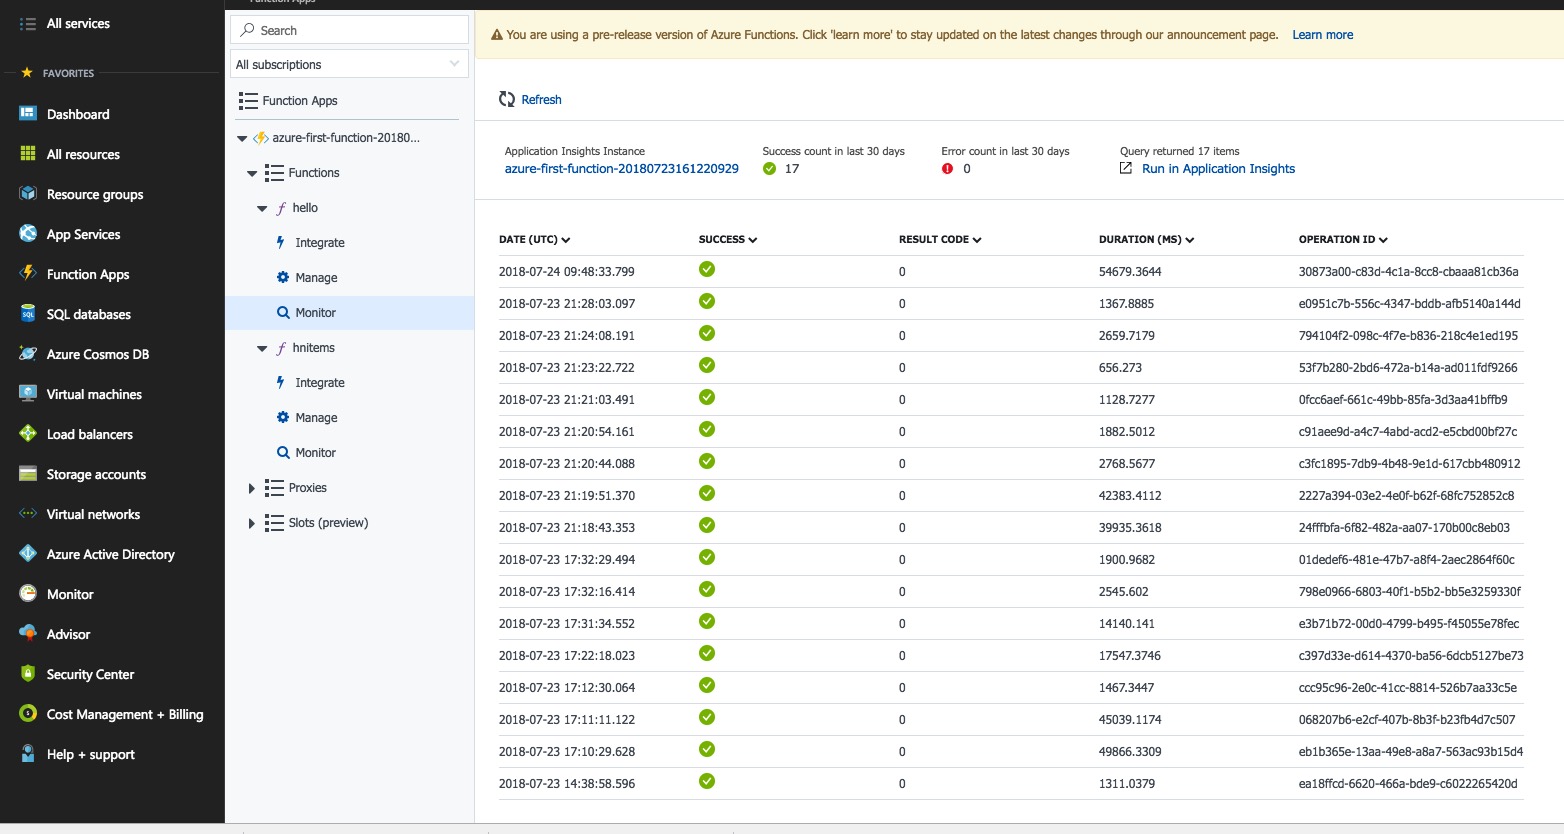
You can see your function and the logs in your Azure Dashboard:
 https://azure.microsoft.com/”>
Updating the function
We are going to rename the function to hnitems. We can remove the post method since we only need to make GET requests. Then we need to check the page number parameter, and handle the case where a non numeric value is passed.
Basically, we just change the function name from hello to hnitems and the request parameter from name to pageNumber.
The HNScraper class is a slightly modified version of the one in chapter 3. The method scrape takes a pageNumber and returns a JSON Array of all hacker news items for this page. You can find the full code in the repository.
@FunctionName("hnitems")
public HttpResponseMessage<String> hnitems(
        @HttpTrigger(name = "req", methods = {"get"}, authLevel = AuthorizationLevel.ANONYMOUS) HttpRequestMessage<Optional<String>> request,
        final ExecutionContext context) {
    context.getLogger().info("Java HTTP trigger processed a request.");

    // Parse query parameter
    String pageNumber = request.getQueryParameters().get("pageNumber");

    if (pageNumber == null) {
        return request.createResponse(400, "Please pass a pageNumber on the query string");
    }else if(!StringUtils.isNumeric(pageNumber)) {
        return request.createResponse(400, "Please pass a numeric pageNumber on the query string");
    }else {
        HNScraper scraper = new HNScraper();
        String json;
        try {
            json = scraper.scrape(pageNumber);
        } catch (JsonProcessingException e) {
            e.printStackTrace();
            return request.createResponse(500, "Internal Server Error while processing HN items: ");
        }
        return request.createResponse(200, json);
    }
}
The full source code is available here: https://github.com/ksahin/java-scraping-azure-function/tree/master
You can now deploy the updated code using:
mvn clean package
mvn azure-functions:deploy
You should have your function URL in the log. It’s time to test our modified API (replace ${function_url} with your own URL)
curl https://${function_url}/api/hnitems?pageNumber=3
And it should respond with the corresponding JSON Array:
[
    {
        "title": "Nvidia Can Artificially Create Slow Motion That Is Better Than a 300K FPS Camera (vice.com)",
        "url": "https://motherboard.vice.com/en_us/article/ywejmy/nvidia-ai-slow-motion-better-than-a-300000-fps-camera",
        "author": "jedberg",
        "score": 27,
        "position": 121,
        "id": 17597105
    },
    {
        "title": "Why fundraising is a terrible experience for founders: Lessons learned (kapwing.com)",
        "url": "https://www.kapwing.com/blog/the-terrible-truths-of-fundraising/",
        "author": "jenthoven",
        "score": 74,
        "position": 122,
        "id": 17594807
    },
    {
        "title": "Why No HTTPS? (whynohttps.com)",
        "url": "https://whynohttps.com",
        "author": "iafrikan",
        "score": 62,
        "position": 123,
        "id": 17599022
    },
   //...
This is it. Instead of returning the JSON array, we could store it in the different database systems supported by Azure.
I suggest you experiment, especially around messaging queues. An interesting architecture for your scrapping project could be to send jobs into a message queue, let Azure function consume these jobs, and save the results into a database. You can read more about this subject here
The possibilities of Azure and other Cloud providers like Amazon Web Service are endless and easy to implement, especially serverless architecture, and I really recommend you to experiment with these tools.
Conclusion
This is the end of this guide. I hope you enjoyed it.
You should now be able to write your own scrapers, inspect the DOM and network requests, deal with Javascript, reproduce AJAX calls, beat Catpchas and Recaptcha, hide your scrapers with different techniques, and deploy your code in the cloud !
If you want to scrape the web at scale, without getting blocked or having to deal with multiple headless browsers, don’t hesitate to try ScrapingBee.
We also have many other articles in our web scraping blog, especially with Python don’t hesitate to take a look.
Happy Scraping!
Kevin

Kevin Sahin
Kevin worked in the web scraping industry for 10 years before co-founding ScrapingBee. He is also the author of the Java Web Scraping Handbook.